Friday, February 29, 2008

Ironing Boards

I've been seeing lots people posting pictures of their ironing boards and decided I wanted to play too. Libby at A Simple Girl is the one who asked to see. In general the covers on all of them are in fair shape. I don't use fusible web when I applique, so I don't have the mess that can create. Mine just get worn with age and use.

I'm lazy. I don't like climbing up and down the stairs in my house to get to the ironing board. My laundry room is on the main floor of my house and my sewing room is upstairs. So....being lazy.....I have more than one ironing board.

Here's the first one. It's a little portable board. When I am piecing, I set it on top of a rolling cart that I have filled with fat quarters. It is sitting just to the right of my chair at the sewing machine so that all I have to do is turn to press something. I love this iron! It's a Norelco steam iron that I bought many years ago. I've tried to buy another just like it but they are no longer made. It gets hot and doesn't spew and spit water when you are using the steam. It has even been dropped on the floor and still works like the day I bought it.

I also have another ironing board upstairs. This one is very old. It and the iron sitting on it were my grandmothers. The iron weighs a ton and is not a steam iron. It still works and when I use it, my muscles get a workout because it is so heavy. This one is set up in what use to be DD's room.


And this last one is the ironing board I keep downstairs. My laundry room is just around the corner. You can see what happens when I don't take it down after I'm through ironing. It becomes the catch all of mail and all sorts of other junk. The iron on this ironing board is my least favorite. I bought it because I had heard lots of people rave about how wonderful they were. What a disappointment! It doesn't get very hot and is a pain in the rear to clean. I won't be buying one like this again. Since it doesn't get very hot, I use it to press DH's shirts for work and the creases in his slacks. My least favorite iron for my least favorite chore!

Thursday, February 28, 2008

My First Quilt

Since I have felt a little under the weather the past several days, I haven't done much in the way of stitching. I thought I would share a few pictures of the very first quilt that I both pieced and quilted. I had quilted other quilts before this one, but they were tops that my mom and grandmother had made and given to me. The first quilt that I totally made by myself is a bargello quilt. Before I show pictures, let me share a little about how I selected my colors.

At the time I decided to make this quilt top, I was also doing some counted cross stitch. I was working on couple of pictures from kits that I had paid $15 for.
Here's what they look like....and they are still unframed! I loved the colors in these pictures and so I took them to the quilt shop when I signed up for the class and picked my fabrics using the pictures to select my color pallet. I took the class in 1989 at a LQS (it is no longer in business) in Waco, TX. We were living in a small community just west of there at the time. Here's my bargello quilt from that class.


We met for 3 classes to make this top. Then we were on our own to finish it. It is a queen size quilt. I hand quilted mine using a large round wooden hoop. It took me 6 months to hand quilt it working a little each evening. Back at that time, I was a busy mom with 2 kids in elementary school. I don't know how I managed to find as much time to sew as I did!

Oh....and about the unframed cross stitch pictures. After I made the quilt and finished the pictures, I thought I would have them framed and hang them in the room. These pictures are long and narrow....about 12 inches wide and 21 inches long. I took them to a local frame shop in the late 1990's and got estimates on having them framed with no mat and using a very plain frame. I was quoted a minimum cost of $102 for each picture. Yep, that's right...at least $204 to frame two $15 kits. I kindly thanked the store owner and told him I would have to think about it. As you can see.....I'm still thinking more than 11 years later. My answer to that professional framing charge is....I don't think so!!! I need to make my own frames and do it myself as I put so much work into those pictures. I have framed several others myself, so I know I can do it once I have the proper size frame made. The pictures are pressed and hanging in the closet with all my fabric stash. I'm going to make it a goal to frame them this year. Hopeful another UFO out of the way!!

Sunday, February 24, 2008

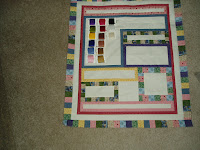
Not a lot going on at my house this weekend. I did finish putting the borders on my stitchery and I selected my floss colors. Here's a picture. Now all I have left to do is trace the design onto the blank blocks.....and begin stitching!

Thursday, February 21, 2008

No new project starts....NOT!!!

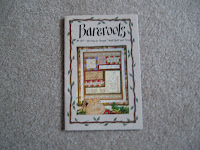
I know I said I wasn't going to start anything new, but I had time on my hands yesterday and I decided work on the Bareroots wallhanging pattern I shared with you earlier. In case you don't remember.....this is it.

I have no affiliation with them, but if you like stitcheries and patterns, you can see more of their products at their website www.Bareroots.com

Andrea at the Welsh Quilter liked the pattern when I showed it and she ordered one too. She already has some of her stitching done. You can see hers here. Seeing hers motivated me to get a start. I decided I wanted to select my own colors, so I am piecing the background first. Then I will trace the designs and do the embroidery. Here's a look at what I pieced last night.

I still have 3 border strips to add. I also have to decide what colors of floss to use. I think I will assemble this into a ziploc bag as a take along project once the design is traced and the floss selected.

When I worked on this last night, I did not sew one of the string blocks I've been making each time I sit down at the machine....so I will make 2 today. I do plan to sew because I am staying in where it is warm. We had sleet after midnight and with it being so cold...the roads are slick and icy. Today was to have been my monthly applique class at LQS. This is the third month I have not been able to go because of the weather. Would someone else like at little sleet, ice and snow?? I'd be happy to try to send it your way!

Tuesday, February 19, 2008

I finished something.

When I was doing my cleaning and organizing in January, I found a set of pillowcases that I had been embroidering about 8 years ago. I had put them away so I could work on other projects and....of course.....they were not finished. This past week I didn't do much stitching, but I did work on those pillowcases. Here they are...all finished!!! I think the red I used for the bird is a little bright in relation to the colors I used for the dogwood blooms, but I wasn't about to take it out and redo them. That color will do just fine on my pillows.


It certainly does feel good to finally finish some of the needlework projects I started long ago and just didn't finish. I hope I can keep that up during this year and clean out some UFO's. I won't commit to not starting something new because I think that would set me up for failure and frustation. I'm going to allow myself to start small projects, but no large quilt projects until I finish the ones I'm currently working on.

Do you see a theme going here with this post and the one before it? I just realized both projects were cardinals. I mentioned in the other post that I'm ready for spring. Well, that hasn't changed....and we are again awaiting another artic front. Our windchills are to be about -10F tonight. With cold winds like that....I think the only cardinals I will be seeing are the ones on these pillowcases. All I can say is BRRrrrr!!!

Tuesday, February 12, 2008

A Touch of Spring!


In all my cleaning and organizing over the past few weeks, I happened to find this block....and it added a little touch of spring to the long, dreary winter days we've been having! The pattern was in the Quilters' Newsletter Monthly, April 2003. It was part of an article written by Mary Sorensen on "Skinny Stems". I made this block about the time the article came out. I can look at it and see how much my applique has improved since 2003. On this block, my skinny stems aren't so skinny! And my circles are not so round. They have these little pointy places that I now know how to prevent. However, this block is going to be completed with all those flaws left just as they are. They are a part of my learning experience! All I need to do to this little guy is decided whether I want to use a button for his eye or whether I want to embroider his eye....then add borders and quilt. This is going to become a small wallhanging for my home. I'll post a picture when I finally finish it. I have it sitting on my cutting table for now, so I can decided about border fabric.....and think of spring.

Wednesday, February 6, 2008

What Color is Your World Today?

As I was sitting at my sewing machine working today, I looked out my window. The world outside my window is white today.

Winter has revisited the midwest and there is a blank of sleet and snow in many areas. My mind began to wander and for some reason the song "Color My World" came to mind. If I remember correctly, it was a song done by Chicago. I do believe I am dating myself by mentioning that!!

Now, for something a little quilt related. I made another block from my scrap bin. I've decided that I will try to make one each time I sit down to sew on a project. So...when I sat down in my chair to start sewing...the first thing I did was sew a block from scraps, then I could move on to my project. Including the block I made this morning, I now have 6 blocks made from my scraps.

If I can keep this up...maybe my scrap bin will eventually be empty!!! Or then again maybe not, because there is always a new project to create more scraps.

Sunday, February 3, 2008

Intentions

Today I had intentions of working on my applique. I am having trouble focusing on that, so I decided to do something else. What to do?? I have nothing prepared and ready to go at the moment, so I grabbed my box of odd sized scraps.
I have been saving my dryer sheets and pressing them to use a backing for string piecing. I took my small scraps and sewed pieces together using the dryer sheets. Here's one of the pieces before trimming.
And after trimming, here's what my blocks look like.

I made 3 of them in just a few minutes. These blocks are 6 inches x 8 1/2 inches. If I do this occassionally, I will eventually have enough blocks to make a lap throw. My Wednesday sewing group makes quilts for a battered women's shelter. Maybe a quilt made from even my smallest scraps would provide a little comfort to someone.