Can you believe it??? Two posts from me in one day! I just didn't feel like ironing and neither did I feel like cleaning. Maybe it is because we have gone from 55 degrees F outside at 6am to 18 degrees and blizzard like conditions at noon. Since it is awful out.....I decided to sew on my bag and finish it.
Here's what my lining looked like before I put it in the bag. I used the bits and pieces I had left from the outside.
And this is how it looks inside the bag. See the little blue square. That's a little pocket I added to hold my cellphone or keys.
I hope you can see the handles in this photo. My handles are only 20 1/2 inches long. That length was determined by the length of my fabric strips. I made them as long as I could by piecing 2 strips together for each handle.
And here's another shot of the bag.
This was not hard to make with Andrea's wonderful instructions. I now have a nice bag and I used up some scraps. I will make more of these. Think I will make one for DD as a gift for next Christmas! I plan to use my bag when I go to the library. It is large enough to hold several books.
Thanks again to the Welsh Quilter for posting her wonderful tutorial. If you are interested, you can find it on her blog. I am not good enough with the computer to link you to the particular post, but if you look in June 2007, you will find her 4 Part tutorial.
Tuesday, January 29, 2008
Is this what you thought???
Ok.....here's what I'm making.
Yes, that's right.....a bucket bag. Andrea, the Welsh Quilter, shared a wonderful tutorial back in June 2007. I've had that bag in my mind since she posted it and when I was cleaning scraps and came across this little collection of small pieces....I thought they would make a cute bag. None of my pieces are large enough to cut the lining and the handles, so I will be piecing them from smaller pieces. I'll share the completed bag when I get it done. It may be next week before I get it finished as I have some mad cleaning to complete before the end of the week! I've also got a ton of ironing to do. Anyone want to come help with that chore????
I had to get out and run a few errands yesterday. My local store probably knows I'm a sucker for plants and that's why they put them right by the door where I have to walk in! Yesterday they had African violets. I have several of those already, but I didn't have this particular color.
This little plant just said, "Take me home.....please!!!!". .........so I did. I thought the measly $2.47 wouldn't break the budget, and it would bring lots of bright moments to the dreary, wintery days we are having. Ahhhh! Dreaming of spring here....with temps dropping outside and snow in the forecast for afternoon.
Monday, January 28, 2008
Do you know what I'm making??
Yesterday I had good intentions of cleaning up some more scraps...cutting them into squares and strips and putting them into bins. I ran across a scrap bag I had picked up a long time ago at LQS. The pieces range from 10 inches x 12 inches up to 15 x 18 and there were 9 pieces in the bag. Hmmm...there's enough to make something here if I do lots of piecing...so I started cutting. I made 4 of these. Do you know what I'm making? You'll have to check back to see. I'm putting them together today and will post a picture tomorrow. The picture may not be a finished item, but you will know from it what I'm making.
I should be cleaning....or appliqueing. I did get 7 berries appliqued on my center medallion. Slow progress, but at least it is progress.
Sunday, January 27, 2008
I've been shopping...
Lately I've complained a lot about the cold weather....so let me say that today is to be a beautiful day in my area. Abundant sunshine and temperatures in the 50's. I must say that isn't too bad for the KC metro area in the winter! Not to worry though, the weather man assures us winter will revisit us about mid-week.
I went to my favorite LQS on Friday. I needed to buy a few items to complete a birthday gift for a quilting friend who lives in Ohio. It was so much fun to fondle fabric and search for something to send to my friend.....especially since I have been out of the house very little since the first week of January. I finally decided on some fat quarters, thread, and a small apron pattern to complete the gift I'm sending. Here's a look at what I bought.
All of the brown and tan prints were from the same fabric line, but I thought it needed a pink and found one that I thought would work. What do you think? The thread is Precensia 100% cotton. I have not tried that brand of thread yet, but my LQS is carrying a large selection of it now. I bought the apron pattern because my friend is a long arm quilter. I thought she might like to make an apron like that to keep her tools at hand when she works.
Of course, I had to do a little shopping for me too!!! I didn't buy fabric though....and I'm so proud of me for that! I did buy two stitchery patterns that I thought were just wonderful.
I won't be starting them soon, but my philosophy is if you don't buy it when you see it.....it will be gone when you go back to get it! I plan to make the Bareroots pattern from stash scraps to hang in my sewing room. I don't have anything hanging on the walls in that room! We have lived in this house for 6 years. It was new when we bought it and for some reason....I have a real problem putting holes in the wall to hang things. Maybe it is because I know this is not the house we will always live in. Am I weird or what???
I bought the redwork pattern because I have been collecting Christmas print fabric for a long time. I am thinking of using those stitcheries as the center of the blocks and then doing something patchwork around them using the fabrics I've collected. This will be a project for another year, but at least I have the pattern bought. I'm going to put it in the box with my fabric.
Thursday, January 24, 2008
Thread...
Since I showed my sewing kit, I thought I would also show how I store and carry my threads that I use for applique. If I am hand piecing with a cotton thread, I always just toss the spool in my little clear sewing box that I showed in my previous post. It's no problem putting one spool in my little box! But when I am working with applique, that's a different matter.
Applique usually requires me to carry a variety of colors. In some of my earlier posts, I've shown you this applique medallion I have been working on. You can see I have several different colors in this piece.
I carry the thread I'm working with in a little plastic pencil box I got for $0.25. There is also a white marking pencil in there.
I can slide it closed and there is a snap to keep it shut.
I keep the rest of the threads that I use for applique in a clear bag that one of my friends gave me. Here's that bag. I use ziploc snack bags inside this to put the various colors in. Putting them in those little bags keeps them nice and neat.
I know there is lots of controversy about what type of thread one should use to do applique. Some people say they would only use cotton, while others say they would only use silk. They each justify why they think their chosen thread is the best. I say, use what works for you and what you like. That's what I do.
I'm going to tell you about my preferences. I don't want anyone to think they have to like what I do. After all, we are different individuals; therefore we may like different things! :-)
I use mostly 50wt. machine embroidery cotton. I have Mettler, Gutterman, and DMC in my cotton collection. I like the DMC best, but it is hard to find and the color selection is limited. I prefer cotton because I personally do not like the slipperiness of silk thread. I find I can make my stitches just as invisible with cotton as I can with silk. However, I do have a few spools of YLI 100wt. silk thread in neutral colors. If I do not have a close color match in cotton thread, then I use silk in one of the neutral colors. I find the color I use most frequently in silk thread is... taupe.
I hope you have enjoyed looking at how I store some of my supplies. I like looking at what others use....and I'm always willing to try something new that may be better than what I currently do.
Saturday, January 19, 2008
What' in my sewing kit?
When I did the cleaning of my sewing room the other day, I also cleaned and organized my sewing box. Today I was thinking about how nice it is to have a clean box....without all the snipped threads sticking to everything.
I've used various bags and boxes to keep my sewing kit in over the years. I have found that I like a rigid box best. I like for it to be seperate from the bag I carry my blocks, threads, and fabric in, and I like for it to be fairly small. Picky little somebody....aren't I??? I thought I would share a few pictures of my sewing box.
I found this neat, clear box in the makeup area of a local store. I thought it would be the perfect size.....and it has proven to be just that.
It is 7.5" wide, 4.5" deep, and 4.5" tall. That's a good size for me to carry along to the sewing groups I attend. As you can see, I keep several small containers inside this box.
I unpacked all of it just so you can see all what I can fit in it.
Now, let's take a look at the things I like to use as I work on my stitching.
I carry 2 small pair of scissors. These are specifically geared toward my applique. I use the sharp pointed pair with extra large finger holes for clipping and very close trimming. The other pair I use when I am cutting a piece for applique out of a larger piece of fabric. This pair has one blunt tip and one sharp tip. I keep the sharp pointed tweezers because I had been told they were handy to have when doing applique, but guess what....the only time I have used them was to pick a splinter out of my friends finger. She couldn't get it out at home, so she asked for help when she got to group and I was able to help! They are so compact...I just leave them in there.
I do needleturn applique and most of the time my size 11 straw needle is the tool I use to turn under the seam allowances. Occassionally I will work with a stubborn fabric that does not want to turn under with the needle, so I use a dampened toothpick. You can see my toothpick with the gold button on top. It keeps the toothpick from rolling around and from getting lost. I learned that little trick from Linda Franz. I prefer toothpicks from Crackerbarrel restaurants because they very smooth and they have little ridges around the top that hold the button shank.
The little bright pink box in the photo above is a travel soap box I had here at home. It is the perfect size to keep my needles and pins.
I unpacked it so you can see what all I manage to fit in it. My favorite needle to use is a Jeana Kimball size 11 straw needle, but....I have other brands too. The little gray item laying just beside the pink box is a Clover needle cassette. I have a package of the Jeana Kimball needles in it and I use that at night when I have a little trouble seeing the eye of the needle to thread. That little thing will easily thread your needle. As I work, I do not glue or baste my applique pieces on my background. I simply use several applique pins. I also like Jeana Kimball's applique pins and those are in the little round box with the green label on top. I also have a box of Clover glass head quilting pins. I love those because they are thin and very sharp. All of that fits in the pink soap box!
To the front of these items are my marking tools. I'll mention them from the front to the back. The white item at the bottom is my herra marker. I use that to mark the crease on the edge of bias that I am going to finger press and stitch down for stems. The black item behind that is my Pentel Clic eraser. I use that to remove pencils marks on applique pieces that I don't quite get turned under with my needle. I also use it to remove visible pencils marks when I handquilt. The gold pencil behind my eraser is a Papermate Sharpwriter mechanical pencil. That is the marking tool I use to mark for handquilting. I use a very light touch and most of it comes out as I stitch. When it doesn't, I then use my Clic eraser. The lime green item is the mechanical pencil I use to mark around applique pieces before I cut them out. The red and black is also just another mechanical pencil for writing reminders and notes. Another marking tool I use when I am working with dark fabrics is a Verithin white marking pencil. I use that to mark both my applique pieces and to mark quilting lines for handquilting. I see I didn't have the white pencil in my box and I need to put it there now! Up by the needles you can also see my 2.5 inch square ruler. It's a compact size perfect for my little box.
I found these two little boxes for $0.50 at Michael's. I knew they would be useful. This is what I did with them.
One holds my thimbles and a sharpener for my pencils. I use different thimbles for different tasks. The thimble on the left is a Clover adjustable thimble. I like to use that one for hand piecing. The thimble in the center is a Roxanne thimble that I got for Christmas from my family several years ago. I like to use that one for all my handquilting. I do not use it if I go out of the house though as it was expensive and I wouldn't want to lose it. It stays safe inside the pretty little box! The thimble on the right is also one I use when I handquilt. I also use that one when I sew on buttons or hem something.
The other little box holds my wool pin cushion with applique pins and sharp quilting pins. There are also probably a few needles stuck in that one too. I like having a box with a lid so I an close it for travel. In between the two boxes is a little pin cushion I made. It is made from the cap of a liter water bottle. I just took a little fiberfil and stuffed it in a circle of fabric, wound some thread around it to close the circle. I then took some glue and put it around the inside of the cap and stuck the stuffed fabric circle in it. I've had that little cushion for about 4 yrs. now and that is where I like to put my needles with different color threads for the applique I am working with.
The metal box sitting off to the side is an Altoids tin. I have the berries for the center medallion of DD's quilt in that. I need to be sewing these on, but I'm having trouble getting motivated.
I am by no means endorsing the above products. I have just found that these are the products that work for me personally as I stitch.
If you read my post.....I would love to see what some of you use for your travel sewing kit and how you organize it.
I've used various bags and boxes to keep my sewing kit in over the years. I have found that I like a rigid box best. I like for it to be seperate from the bag I carry my blocks, threads, and fabric in, and I like for it to be fairly small. Picky little somebody....aren't I??? I thought I would share a few pictures of my sewing box.
I found this neat, clear box in the makeup area of a local store. I thought it would be the perfect size.....and it has proven to be just that.
It is 7.5" wide, 4.5" deep, and 4.5" tall. That's a good size for me to carry along to the sewing groups I attend. As you can see, I keep several small containers inside this box.
I unpacked all of it just so you can see all what I can fit in it.
Now, let's take a look at the things I like to use as I work on my stitching.
I carry 2 small pair of scissors. These are specifically geared toward my applique. I use the sharp pointed pair with extra large finger holes for clipping and very close trimming. The other pair I use when I am cutting a piece for applique out of a larger piece of fabric. This pair has one blunt tip and one sharp tip. I keep the sharp pointed tweezers because I had been told they were handy to have when doing applique, but guess what....the only time I have used them was to pick a splinter out of my friends finger. She couldn't get it out at home, so she asked for help when she got to group and I was able to help! They are so compact...I just leave them in there.
I do needleturn applique and most of the time my size 11 straw needle is the tool I use to turn under the seam allowances. Occassionally I will work with a stubborn fabric that does not want to turn under with the needle, so I use a dampened toothpick. You can see my toothpick with the gold button on top. It keeps the toothpick from rolling around and from getting lost. I learned that little trick from Linda Franz. I prefer toothpicks from Crackerbarrel restaurants because they very smooth and they have little ridges around the top that hold the button shank.
The little bright pink box in the photo above is a travel soap box I had here at home. It is the perfect size to keep my needles and pins.
I unpacked it so you can see what all I manage to fit in it. My favorite needle to use is a Jeana Kimball size 11 straw needle, but....I have other brands too. The little gray item laying just beside the pink box is a Clover needle cassette. I have a package of the Jeana Kimball needles in it and I use that at night when I have a little trouble seeing the eye of the needle to thread. That little thing will easily thread your needle. As I work, I do not glue or baste my applique pieces on my background. I simply use several applique pins. I also like Jeana Kimball's applique pins and those are in the little round box with the green label on top. I also have a box of Clover glass head quilting pins. I love those because they are thin and very sharp. All of that fits in the pink soap box!
To the front of these items are my marking tools. I'll mention them from the front to the back. The white item at the bottom is my herra marker. I use that to mark the crease on the edge of bias that I am going to finger press and stitch down for stems. The black item behind that is my Pentel Clic eraser. I use that to remove pencils marks on applique pieces that I don't quite get turned under with my needle. I also use it to remove visible pencils marks when I handquilt. The gold pencil behind my eraser is a Papermate Sharpwriter mechanical pencil. That is the marking tool I use to mark for handquilting. I use a very light touch and most of it comes out as I stitch. When it doesn't, I then use my Clic eraser. The lime green item is the mechanical pencil I use to mark around applique pieces before I cut them out. The red and black is also just another mechanical pencil for writing reminders and notes. Another marking tool I use when I am working with dark fabrics is a Verithin white marking pencil. I use that to mark both my applique pieces and to mark quilting lines for handquilting. I see I didn't have the white pencil in my box and I need to put it there now! Up by the needles you can also see my 2.5 inch square ruler. It's a compact size perfect for my little box.
I found these two little boxes for $0.50 at Michael's. I knew they would be useful. This is what I did with them.
One holds my thimbles and a sharpener for my pencils. I use different thimbles for different tasks. The thimble on the left is a Clover adjustable thimble. I like to use that one for hand piecing. The thimble in the center is a Roxanne thimble that I got for Christmas from my family several years ago. I like to use that one for all my handquilting. I do not use it if I go out of the house though as it was expensive and I wouldn't want to lose it. It stays safe inside the pretty little box! The thimble on the right is also one I use when I handquilt. I also use that one when I sew on buttons or hem something.
The other little box holds my wool pin cushion with applique pins and sharp quilting pins. There are also probably a few needles stuck in that one too. I like having a box with a lid so I an close it for travel. In between the two boxes is a little pin cushion I made. It is made from the cap of a liter water bottle. I just took a little fiberfil and stuffed it in a circle of fabric, wound some thread around it to close the circle. I then took some glue and put it around the inside of the cap and stuck the stuffed fabric circle in it. I've had that little cushion for about 4 yrs. now and that is where I like to put my needles with different color threads for the applique I am working with.
The metal box sitting off to the side is an Altoids tin. I have the berries for the center medallion of DD's quilt in that. I need to be sewing these on, but I'm having trouble getting motivated.
I am by no means endorsing the above products. I have just found that these are the products that work for me personally as I stitch.
If you read my post.....I would love to see what some of you use for your travel sewing kit and how you organize it.
Friday, January 18, 2008
After.....
It was a late night at my house. I worked and worked and worked...and this is what I accomplished!
It could still be better if I had a different storage system for the things on the floor under the cutting table, but at least for now it is all in bins or baskets and neatly stacked. Sorry the pics aren't real clear, but hey.....it was 1:30am!
Now I'm off to shovel the drive before the next artic front arrives later today. I think a nap is in my future for this afternoon.
Thursday, January 17, 2008
De-Cluttering!!!
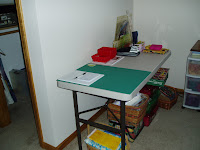
Not much posting from me lately, but I do have a good excuse. I have been slowly working my way through my house de-cluttering, organizing, and cleaning. I've had some days by myself and I thought this would be a good time to really tackle things. My sewing room has become the dumping ground for sewing related items that had been strung throughout the house. I brought them upstairs, and piled them all on my cutting area to deal with when I finally got around to working in my sewing/computer room. Since it is 16 F at noon and I'm really not in the mood to go out and shovel snow....I decided today is the day to work up here in the sewing room where it is a bit warmer.
I've been reading some blogs where people have been showing their messy cutting tables and then listing 15 things they spy on it. I saw it on Wendy's blog today and decided I would share too. So, here it is.....
my cutting table with all its mess! I can see:
1. Stork scissors in my thread caddy
2. wrist pin cushion
3. spray bottle
4. iron
5. quilting rulers
6. power strip
7. folded DJ quilt top
8. zippers
9. thread
10. metal diamond template for a future project
11 mechanical pencils
12. white marking pencils
13. circle template
14. slacks waiting for repairs
15. small pink storage boxes
There's plenty more there! I hope you will check back again in a day or so to see what it looks like when I finish cleaning. I plan to post an after picture. I cleaned this room and posted a picture back on Dec. 1. Not putting things away as I should have has lead to this mess!
In an earlier post on Dec. 8, 2007, I wrote about Canadian geese and my thoughts concerning them. DS gave me a wonderful Christmas present.... a lovely handmade mug for my hot tea...and a goose!
This is a nice goose though because it won't leave a mess in my yard! I'm contemplating what I'm going to name it.
DD gave me a beautiful quilt calendar and a thimble for my collection. I love collecting thimbles.
Please be sure to enlarge the photo and read what's on the thimble!
We are a family who love to tease one another. Both kids did good this year!! Before I end this I want to show you a little craft item I picked up in Virginia a few years ago. I keep it on my kitchen stove as I see it there everyday. It describes exactly how I feel about my family.
Saturday, January 12, 2008
No pictures today, but I thought I would share so information that DD sent to me. If you are a Jane Austen fan and live in the US, Masterpiece Theatre on PBS will be showing adaptations of six of her novels starting Sunday, Jan. 13, 2008. If you are interested, you might want to check the listings to see if it is available in your area. I know I will be watching!
Meanwhile, I have to prepare some more pieces for the applique I'm working on. I plan to get that done today along with my Sat. housework so I can sit and stitch on Sunday evening without feeling guilty.
Wednesday, January 9, 2008
Today I went to my Wednesday sewing group for the first time since before Thanksgiving. It was nice to be back with good friends talking and stitching. I worked on the center medallion of DD's quilt and made a little more progress. I sewed on another flower and started sewing on some berries. There are many berries on this block...so I will be sewing berries for a while. Sorry, but I didn't take any pictures. I'll try to get some soon....and make my next post more sewing related.
I have several days where I don't have to worry about meals and laundry for DH, so I'm busy cleaning and organizing. This is what I worked on today.
I decided to clean out my spices and throw out some that I've had for several years. I know you aren't suppose to keep them for years...so it was time for me to tackle this chore. After I cleaned....this is what my cabinet looked like. I can easily find whatever I need.
And since I was in the cleaning and organizing mood in the kitchen, I worked in my pantry. It looks neater than it has in a long time. Would you like to take a peak???
I've always kept a well stock pantry. I got in that habit back when we lived 30 miles from the nearest grocery store. I especially make sure I have plenty on hand during the winter when we get snow and ice. That way I don't have to get out when it is cold and nasty. I am person who also stocks up on things that I frequently use when I find them on sale. That's a habit that has served me well through the years in stretching our food budget. Some of my friends don't believe in keeping much food on hand, and they make fun of me because I do have a full pantry. I just tell them.....I'm prepared for a disaster and I won't starve!
During the Christmas holidays, I kept hoping my Christmas Cactus would bloom. I got this plant as a "welcome to the neighborhood" gift 12 years ago. Many years it has been in bloom at Christmas, but not this year. It has waited until January to provide its beautiful blooms.
Isn't it pretty!
I'm a plant lover and I have lots of houseplants.
Here's a just a few of the many I have.
I've had this plant for a very long time. It is 29 years old this year... and has been moved from Texas, to Virginia, and then to Missouri. I especially enjoy my houseplants in the winter when everything outside is so brown and bleak.
Wednesday, January 2, 2008
Schoolhouse Fabrics
Brrrr! My thermometer says 7 degrees F this morning and the weatherman says we are headed for a balmy 24F today. I say that makes for a good day to stay inside. I have plenty to keep me busy. There are mountains of laundry awaiting my attention. DH had these holidays off, so I tried to spend time with him instead of doing all housework after we got home from our trip. Now it is time to concentrate on getting the household chores done.
I told you in one of my previous posts that I went shopping while we were visiting DD in south west Virginia. I drove down to Schoolhouse Fabrics in Floyd VA to do a little shopping. When I lived in this area, I would often make the 35mile drive down to shop. Their prices are generally much cheaper than shops in the city and that has not changed. They are located in an old school building and have fabric in all the rooms. Here's a few pictures I snapped.
Isn't this a lovely old school building! Best part is it is filled with fabric.
I snapped this photo from the parking lot. It's not great, but you can see the mountains off in the distance. They truly look blue....hence "The Blue Ridge Mountains!"
Floyd, VA is about 7 miles off the Blue Ridge Parkway. If you are ever on vacation and driving down the parkway....and feel the need to do a little shopping.....this is one place to visit!
I didn't have any specific fabrics in mind when I went shopping, I just look for interesting things to use in my applique and other projects. I found plenty. See the rolls in the center. Those are fat quarters. The two pale green are fabrics I'm collecting for a pink and green quilt. The white one in the center is an interesting birch bark pattern. That fabric is for my applique collection. It is wonderful for white flower petals, sea gulls, animal fur, etc. The green fabric on the right...is prints of cabbage. It is also for my applique stash. It will be wonderful to use for shaded leaves. The purple and pink in the cabbage will also work well for flower buds. The gold fabric in the center back will be added to a maple leaf quilt I'm planning to make. I have been collecting fabrics for a maple leaf quilts for many years. I probably have enough to make 5 or 6 quilts!! The coffee print fabric will be used in a stitchery project. I have some embroidery transfers of coffee items and I plan to use that fabric with them.
I hand quilt and I found this template that I thought I could use on the borders of a top I need to prepare for quilting.
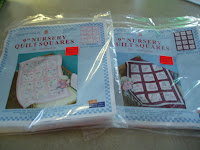
Schoolhouse Fabrics also had one room with craft items and they had one wall with these pre-printed quilt blocks. They had so many of these and in many different patterns.....most I had not seen before! I bought these two and plan to re-trace them on a good quality unbleached muslin. I loved the prints, but not the fabric they are printed on.
I also still sew some garments. I bought these fabrics for DD. The red plaid will be a little A-line skirt, the red dot a button-front shirt, and the burgundy mini check another skirt.
I also bought a book of Hardanger patterns for DD. I didn't get a picture of that.
In 2008, I plan to cut back on fabric purchases for quilting and use fabrics in my stash. I bought these Dec. 27, 2007....so I didn't break my goal!! I'm planning to get back to work on the center medallion for DD's quilt. It's time to work hard on that and get it finished so I can put the top together. I'm also anxious to get back to work on the botanicals I've been making through the applique class I take monthly. These are designed by Dinah Jefferies of Gardencity Gateworks. I haven't posted a picture of these in a while....so here's my hyacinth.
Subscribe to:
Posts (Atom)